10 조건문
else
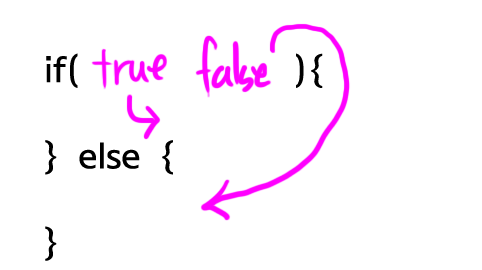
if만으로는 좀 더 복잡한 상황을 처리하는데 부족하다. 아래의 그림처럼 if-else절은 if 절의 값이 true일 때 then절이 실행되고, false일 때 else절이 실행된다.
아래 예제를 보자. 결과는 1이다.
package org.opentutorials.javatutorials.condition;

public class Condition3Demo {

    public static void main(String[] args) {
        if (true) {
            System.out.println(1);
        } else {
            System.out.println(2);
        }

    }

}
다음 예제의 결과는 2다.
if(false){
    System.out.println(1);
} else {
    System.out.println(2);
}
else if
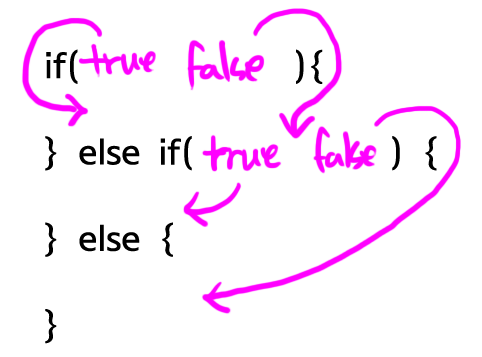
else if절을 이용하면 조건문의 흐름을 좀 더 자유롭게 제어할 수 있다. if절의 값이 true라면 then절이 실행된다. false라면 else if절로 제어가 넘어간다. else if절의 값이 true라면 else if then절이 실행된다. false라면 else 절이 실행된다. else if절은 여러 개가 복수로 등장할 수 있고, else절은 생략이 가능하다. else 절이 else if 절보다 먼저 등장할 수는 없다.
아래 예제를 보자. 결과는 2다.
package org.opentutorials.javatutorials.condition;

public class ElseDemo {

    public static void main(String[] args) {
        if (false) {
            System.out.println(1);
        } else if (true) {
            System.out.println(2);
        } else if (true) {
            System.out.println(3);
        } else {
            System.out.println(4);
        }

    }

}
다음 예제의 결과는 3이다.
if(false){
    System.out.println(1);
} else if(false) {
    System.out.println(2);
} else if(true) {
    System.out.println(3);
} else {
    System.out.println(4);
}
다음 예제의 결과는 4다.
if(false){
    System.out.println(1);
} else if(false) {
    System.out.println(2);
} else if(false) {
    System.out.println(3);
} else {
    System.out.println(4);
}
